
Cyclone RX3 Valve Adjustment
With the possible exception of the BMW airhead engines, adjusting the valves on any motorcycle isn't a lot of fun. While the actual adjustment itself is usually pretty simple and straightforward, getting to the valves is often a laborious process requiring removal of fairings, gas tanks and other parts. Once you can see the valves, it's then common to have to work in a very cramped space with restricted visibility and little room for hands and tools.
The RX3 is no exception to this general rule. While the teardown process isn't as involved as on bikes using shim and bucket valve adjustment, it's still not fun - and it has to be done more often then the shim and bucket designs. Every 2500 miles if you stick by the manual's recommendations. It's probably the most difficult and time consuming part of regular maintenance on the RX3.
The first thing to do is to read the CSC RX3 service manual and/or view the CSC tutorial on valve adjustment (http://www.cscmotorcycles.com/Articles.asp?ID=267). They make it sound easy, but for anyone with no experience adjusting valves it's not going to be simple or fun (and it's not a lot of fun even if you have experience!). Note that the engine must be cold. Do it after the bike has been sitting overnight.
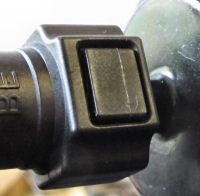 Pulling the seat and fairings is pretty simple and CSC give decent instructions there. It's pretty obvious which screws and bolts top remove. This will probably take 15-20 minutes. Then you get to the point at which CSC say "remove the fuel tank". Hmm. Easy to say...First you have to disconnect a couple of electrical plugs that attach it to the wiring harness. Then you have to remove a couple of breather tubes (small diameter black rubber tubes held in place with simple clips). Easy. Now you have to disconnect the fuel hose. The connection has small buttons on each side (see image on left). You push them in and you can then separate the fuel hose.
There are two types of fuel hose quick disconnect. First there is the type that actuates a valve as it disconnects to that both sides of the hose seal off as the connection is broken and no fuel is lost. Second is the type you'll find on the RX3. It's a quick disconnect, but there's no internal valve, so as soon as you separate the hoses, residual fuel will flow out from the tank side hose unless you have the tank in such an orientation that the hose is pointing upwards (which is pretty much impossible given the geometry and length of the hoses. Be prepared, you will likely be spilling some gas. Have a container ready to catch any gas that leaks out when you separate the connector. You won't drain the tank since the fuel feed comes via the fuel pump (which obviously isn't running), but you'll drain the gas that's in the hose. You don't need to drain the tank before removing it, but the less fuel there is in there the lighter it will be.
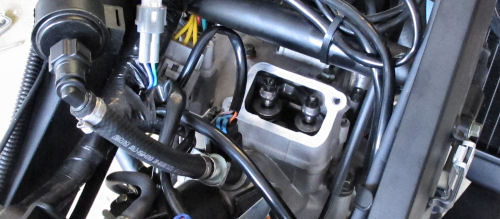
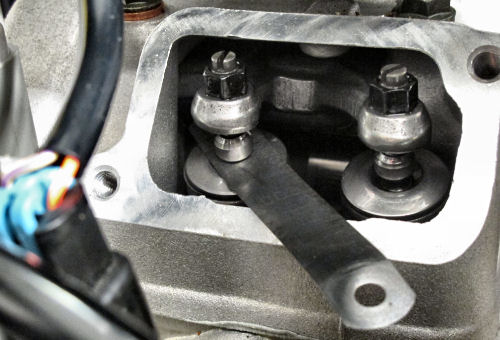
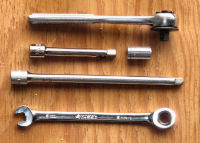 With the tank removed it's pretty easy to get to the cover over the intake valve adjustment screws (they're the ones facing towards the back of the bike, see picture above). The two 8mm bolts are in there pretty tight from the factory so expect to have to apply some pressure to break them free. After removing the cover, access to the valve adjustments is pretty easy. Again the lock nuts on the adjusting screws will be pretty tight. There's room to get either an 8mm socket or an 8mm open end wrench on them. If you're using a socket, a 1/4" drive system will be smaller and easier to get in there than a 3/8" system. I found the tools shown on the right to be most useful. They are a 1/4" ratchet, an 8mm 6-point socket, a 3" and a 6" extension and an 8mm open-end ratcheting-ring combination wrench. With those you should be able to get at all the fasteners and the lock nuts. See the tools page for tool recommendations.
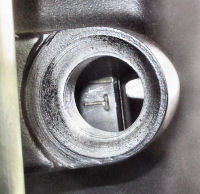 Set the engine to Top Dead Center (TDC) as described by CSC. On the left side of the bike you remove the cover from the access port using a 10mm hex wrench and rotate the engine (clockwise) via the 10mm socket you will see inside. Removing the cover and looking into the port on the front of the same cover you'll see part of the alternator rotor with timing marks and at one point on the circumference you'll see a "T" inscribed. When you see the "T" in that port, you're at TDC and the valves are ready to be checked and adjusted.
Now you can use feeler gauges to measure the gap between the top of the valve stem and the rocker arm (bottom of adjustment screw). The spec on clearance is between 0.04mm and 0.06mm. If you have metric feeler gauges, that means the 0.06mm gauge should just slip into the gap, but the 0.07mm shouldn't. If you have inch size gauges, the 0.002" (0.058mm) gauge should slide into the gap, but a 0.0025" (0.063mm) or 0.003" (0.0076mm) should not. I found all the gaps at the first, 500 mile, valve check to be around 0.1mm and others have reported similar observations that the valves are set wide. Note that the feeler gauges may not easily slip into the gap, even if the gap is bigger than the gauge. They have to be slid in at the correct angle, avoiding any little steps that might be in the way. The measurement is not if they go in easily, but how tight they are held when they are in there. You may have to struggle a bit to get them into the gap, but if they slide easily one they are in there, the gap is bigger than the gauge. It's better to have the valve clearances slightly wide rather than too narrow since they tend to narrow with time and tight valves can cause more damage than slightly lose valves. Eventually really tight valves result in burning of the valve seat. Loose valves will affect performance and be noisy, but don't cause much damage to the engine. It's best to set the valves at the wide end of their range (0.06mm in this case). This gives them room to wear (which closes the gap) by 0.02mm and still be within spec.
To adjust the valve clearance, back off the lock nut, insert the correct size (0.06mm or 0.002") feeler gauge between the valve and rocker arm and gently tighten down the screw until it just starts to grip the blade of the feeler gauge. At that point the theory is you try to hold the screw in position while you tighten down the locknut and your clearance is set. In practice it probably won't be. Something will have moved. When you check the gap again it most likely won't be what you thought it should be, so you repeat the process. The gauge you use should just slide in there. The next size up should not. And you repeat it again. And again. Until you get it right. Realize that you are trying to get a gap to within 0.01mm (0.0004") using a screw. If the screw has a really fine pitch, say 2 turns/mm, turning it by just 1/50th of a turn (7.2 degrees) will change the gap by 0.01mm, so it's a very sensitive adjustment and can easily change as you tighten the locknut. Be prepared for frustration, but eventually you'll get it right. How tight should the locknut be? Pretty tight! CSC don't seem to have any torque specs for the locknuts and it would be very hard to get a torque wrench in the available space anyway, but the locknuts on the somewhat similar Ninja 250 have a spec of 12 ft.lbs. Given that you'll be using a short wrench, just tighten then up about as much as you can (without getting really excessive). You do not want them coming loose when the engine is running. However you don't want to strip the threads either.
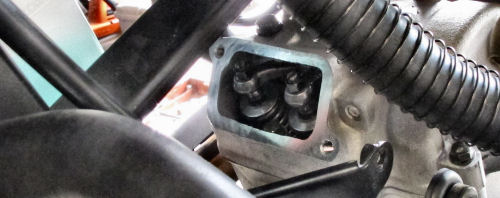
That was the easy part. Now you get to the exhaust valves. The cover is hidden away at the front of the engine, between the radiators and under one of the frame cross members. CSC says you only need to unbolt the radiators and move them to one side to get to the exhaust valves. I'm not so sure. Maybe it can be done that way with enough practice, but I ended up also taking the top hose off the radiator on the left side of the bike so I could move it further out of the way and work mostly from the left side. You shouldn't lose much (if any water) as long as you keep the hose from the radiator pointing up.
Whatever you do (short of taking the engine out of the bike), access to the exhaust valves is limited. There's not much space for hands, feeler gauges, wrenches and a flashlight in there at the same time. It can be done, but it's very awkward and very cramped. I suspect at the factory they adjust the valves with the engine on the bench (easy), then install the engine in the bike. Again you'll probably go around and around, adjusting, checking, readjusting, rechecking etc. etc. until you get the gap just right. You can't give up, so this may take some time, but it's not something you want to rush and it's worth extra time to get it right.
Once you've finished, rotate the engine a few times and set it back to TDC. Measure the valve clearances again. If they still look good, you're done and you can put everything back you took off and reconnect and plugs and sockets in the wiring harness you disconnected. If not, then you repeat the adjustment process. Once you've gotten all the covers back on and the tank reinstalled, before you put the fairings back start the bike up and make sure it runs with no unusual noises. It it all sounds good you can put the fairing back. If it doesn't sound good you've got more work to do! Loud clattering means one of more valve clearances have become too wide either because you set them wrong or because you didn't tighten up the locknuts.
How long will this take? I'd say that once you've done it once (or twice) maybe you could get the whole thing done in about an hour and a half to two hours. CSC estimate "under an hour" for the job once you know the procedure, but I have my doubts about that. They suggest that actually setting the valves only takes a few minutes, but again, that's not my experience so far. Maybe 10 minutes on a really good day for the intake valves, but quite a bit longer for the exhausts since there's so little room to work. If it's your first time, it could take several hours, maybe a whole afternoon with stops for coffee. All I can say is that if it's not going well, take a break and come back to it later. Eventually you'll get it right.